Cute As A Bug Ladybug Birthday Cake
A Cake to Make Her Smile
Pin It
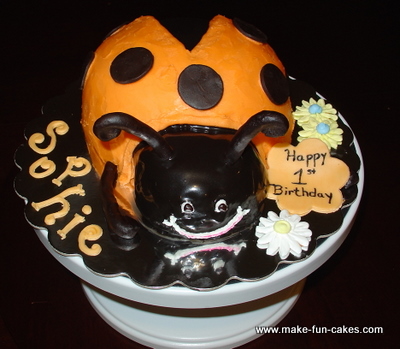
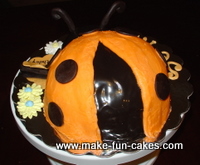
A ladybug birthday cake makes an adorable 1st birthday cake for a little girl. This birthday cake was fun and challenging. I thought fondant would be easy and would create a nice, smooth look, but my clients only wanted buttercream icing – no fondant. Without fondant I had to think of something else to create a smooth shell look. I chose ganache for this particular cake. The cake was chocolate flavor and the filling was vanilla pudding. The cake was frosted with buttercream icing tinted orange.
Instructions for making a ladybug birthday cake with buttercream icing:
Baking the cake
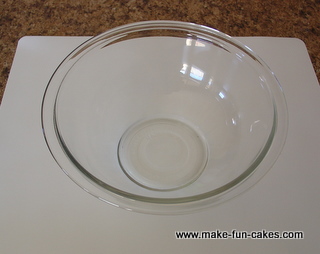
To make the ladybug body, bake your favorite cake recipe in a round, glass oven-safe mixing bowl. Make sure to generously grease and flour the bowl or use a baking nonstick cooking spray so the cake will easily come out of the pan.
When the cake is finished baking, cool it on a wire rack for 10-15 minutes. Then remove the cake from the pan and let it cool completely (usually 60-90 minutes depending on the temperature of your home).

When the cake is completely cool, turn it over and using either a cake leveler or a sharp knife cut the “belly” off of the cake so it will lay flat on the cake board. Set aside the excess cake you have cut off. Place the cake in the freezer for a minimum of 15 minutes so it is easier to work with. (I personally like to bake my cakes and then freeze them overnight. They are so much easier to work with when they are frozen.)
Take the excess cake (the “belly”) you have removed and pull out and discard any crusts or dry parts. Next, crumble the remaining excess cake until they are crumbs. You will need at least 1 cup of cake crumbs. (Making cupcakes out of the extra cake batter ensures that you will have a good supply of cake to crumble. Place the cake crumbs in an airtight container while you prepare the frosting.
Frosting
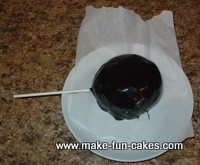
Prepare your favorite buttercream frosting recipe. When frosting is finished, add 1 1/2 to 2 tablespoons frosting to the cake crumbs. Mix well and then form into a ball. This will be your ladybug head so make it a size that fits your ladybug body. When you have the right size ball, place a lollipop stick in the center and leave the cake ball lady bug head in the freezer to harden (at least 15 minutes).
After the ladybug body is chilled or frozen enough to work with, pull it out of the freezer. If you are going to fill the cake, this is the time to cut, level and tort it. After filling the cake, return it to the freezer for at least another 15 minutes.
Ganache
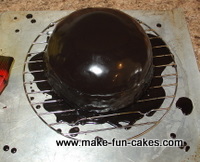
Make chocolate ganache and add enough black food coloring to get the ganache really black. Place the ladybug body cake on a cooling rack and place the cooling rack on a cookie sheet (to catch spills).
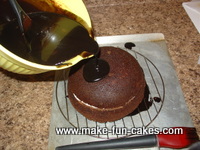
Pour the ganache over the cake, covering it completely. You may need to use the back of a spoon or a pastry brush to evenly cover the cake. When finished let ganache harden (putting the cake in the fridge or freezer helps).
Next, cover the ladybug head with ganache. You can either dip it in the ganache, holding onto the lollipop stick or pour the ganache over the head using the same method as you used with the body. When finished, allow the ganache to harden.
Lady Bug Face
Pull the lollipop stick out of the head. Either flatten the side of the head that will sit against the body or cut the back of the ball, so it will be flat against the body.
Using white icing and round Wilton tip #5, make two ovals for the eyes. Using blue, brown or black icing and round Wilton tip #3, make a circle in the center of each eye. Using white, red or pink icing make the mouth.
Modeling Chocolate or Fondant
The legs and antennae for your ladybug birthday cake should be black. You can use modeling chocolate or fondant colored with black color paste. I used modeling chocolate for this cake.
Antennae
Take two pieces of fondant of equal size and roll them out in a log shape. Roll one end of each antennae a two to three rotations to make the curly antennae end. Determine where you want each antennae to be located on the ladybug head. Using a skewer, make two holes for the antennae. Place a small amount of icing in each hole before inserting the antennae into the ladybug head.
Prepare the cake board. Place the ladybug body on the board and then attach the ladybug head to the body with some frosting.
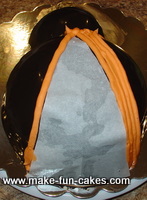
Measure and cut out a long thin triangle of parchment paper that will represent the black body of the ladybug, not covered by the wings. Through trial and error I got the shape I wanted. I tested the parchment paper shape on the mixing bowl the cake was baked in. When satisfied with the shape of your parchment triangle, place it on the cake in the center of the ladybug back.
Using Wilton round tip #12, outline the rest of the body not covered with the parchment paper. Pipe frosting back and forth until the whole body is covered. Using a hot spatula, smooth the frosting. Carefully remove the parchment paper.
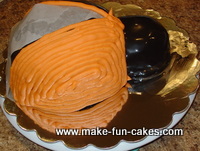
At this point, outline the ladybug body with frosting to add a nice polished finish.
Spots
Using black modeling chocolate or fondant, cut out circles with a small round cookie cutter. Place the circles randomly on the ladybug shell.
Legs
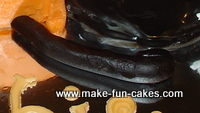
Roll out two pieces of fondant of equal size into a log shape. Make a ball at the end of each log. Flatten the ball slightly for the “hand”.
Attach the legs to the ladybug cake with some frosting.
Check out the back view of my ladybug birthday cake. The ganache cover looks great on the back.
The ladybug birthday cake is now complete. Add any finishing touches to the birthday cake such as royal icing or fondant flowers, a birthday message or bows.
Although this cake was made for a first birthday, a ladybug birthday cake would make any birthday child happy. Pink or red ladybugs may be the most common in a cake, the cake can be made in any color you want.
Good luck with your ladybug cake!
Go from Ladybug Birthday Cake
to 1st Birthday Cake Designs
Ladybug Birthday Cake to Home Page
